做自己,因为别人都在做自己。
– Oscar Wilde
这是我新博客的第一篇文章。我刚开始写这个新博客,因此请继续关注。在下方订阅,以便在我更新新文章时您会收到通知。
做自己,因为别人都在做自己。
– Oscar Wilde
这是我新博客的第一篇文章。我刚开始写这个新博客,因此请继续关注。在下方订阅,以便在我更新新文章时您会收到通知。
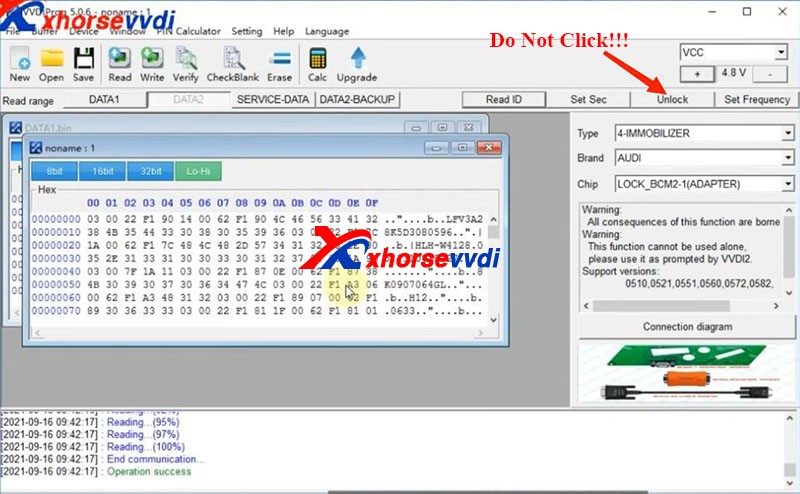
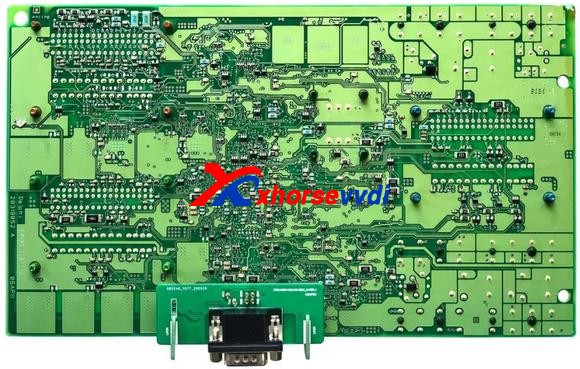
Recently released Xhorse BCM2 Solder-free Adapter allows users to read encrypted Audi BCM2 module, but how to know if it’s a locked version? In this article we’ll raise two ways:
Generally, BCM2 modules before 2013 are unencrypted while those after 2013 are encrypted.
However, there are exceptions after 2013 and it’s hard to judge 2013 versions.
Then we have
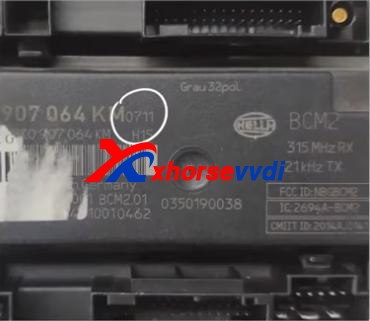
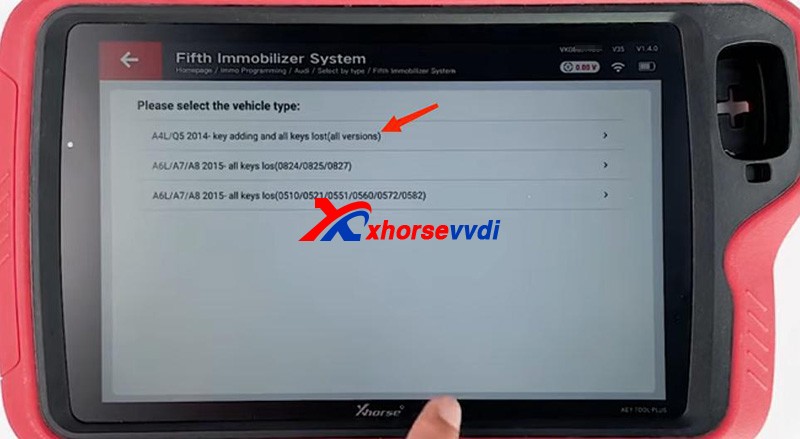
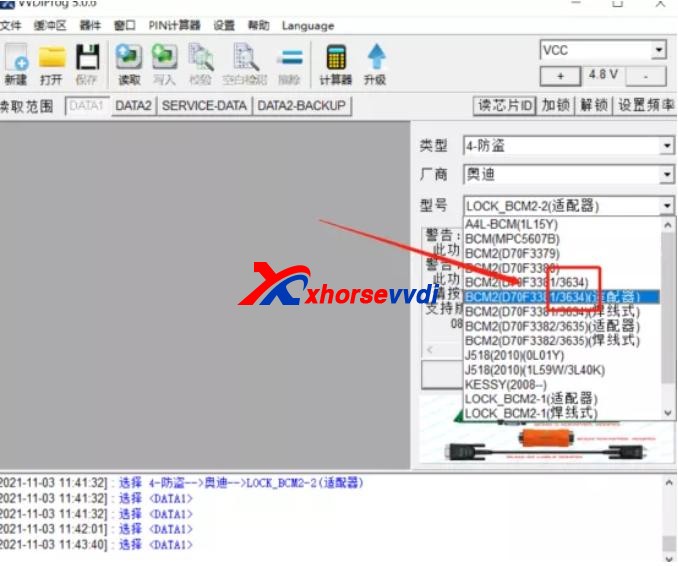
Method 1. Judge by the number on the BCM2 module
After we remove a BCM2 module, check the number on the box. (Here we have “0711”)
On the chip selection page of VVDI PROG or VVDI Key Tool Plus, supported numbers are listed on the below.
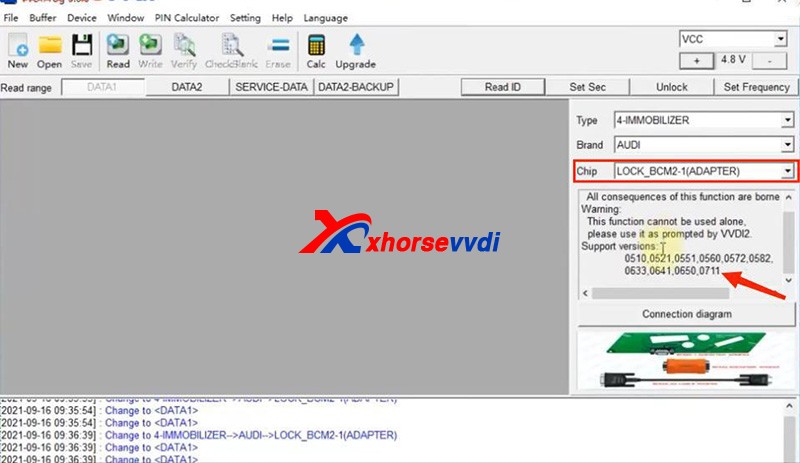
If our BCM2 number is on the list, we need to read it by an encrypted BCM2 Adapter.
Notes:
1)VVDI PROG has “LOCK_BCM2-1(ADAPTER)” and “LOCK_BCM2-2(ADAPTER)”
2)For our “0711”, we should select “(all versions)” on Key Tool Plus.
If we cannot find a number on our BCM2 modules, remove the cover to check the number on the chip of the circuit board.

Then see if our number is listed on unencrypted versions.
If so, read it by the selection prompt (our “3634” is unencrypted and it can be read in a soldering/solder-free way);
If not, Do Not Try to read a unknown-version BCM2 and contact your dealer to confirm.
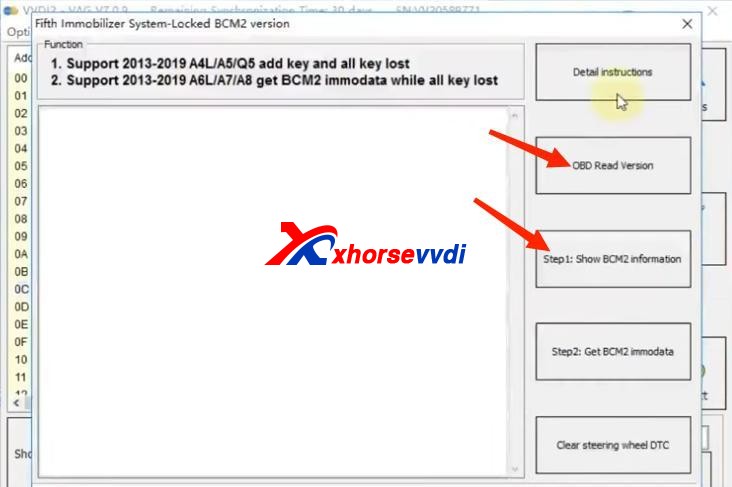
Method 2. Read BCM2 info by VVDI2/Key Tool Plus
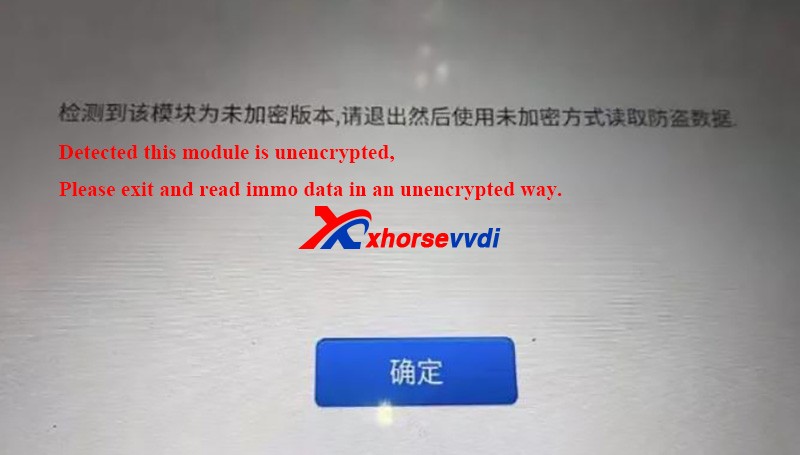
Sometimes we find part of BCM2 modules on the encrypted list are unencrypted, so we have the second way – OBD identify/read.
Before We Remove A BCM2 From A Vehicle, connect VVDI2/Key Tool Plus to your vehicle via OBD to check.
Path 1 (on VVDI2):
Path 2 (on Key Tool Plus):
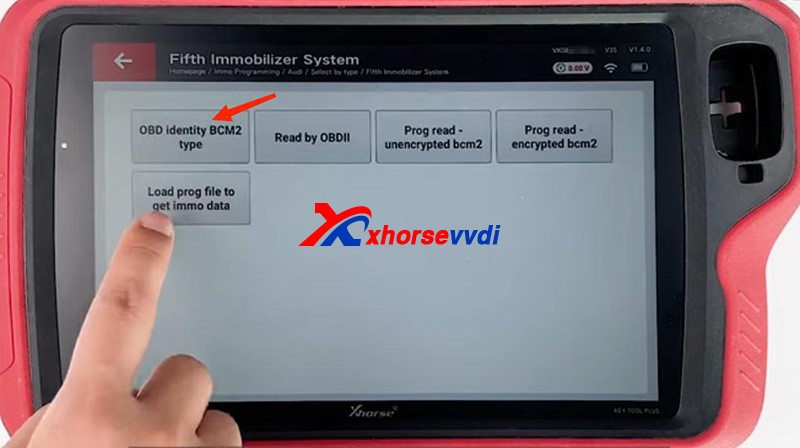
It’s accurate to read BCM info via OBD, and then follow the instruction:
For unencrypted versions, read D-FLASH and P-FLASH without encrypted BCM2 adapters.
For encrypted versions, Do use encrypted BCM2 adapters.
Other tips
Alright, that’s how we identify BCM2 status and some tips during operation.Thanks to xhorsevvdi for making this article: http://blog.xhorsevvdi.com/how-to-identify-an-encrypted-audi-bcm-by-xhorse-programmers/
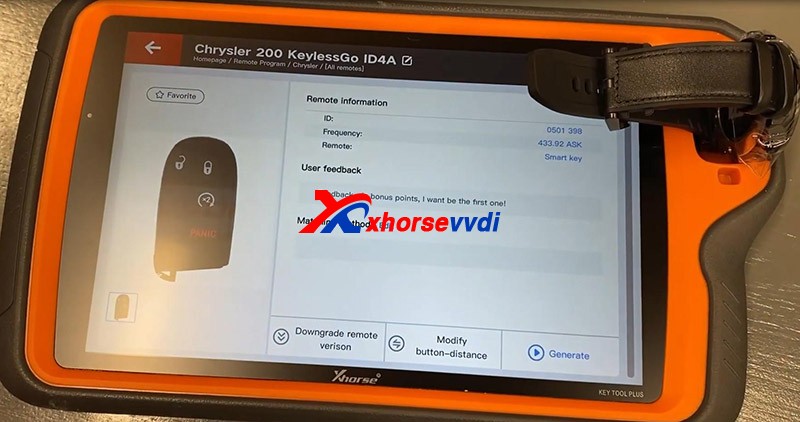
This is a guide on how to use Xhorse Keylessgo Watch configuration & programming to your vehicle step-by-step.

SW-007 Keyless go Watch is another Xhorse Universal Smart remote. It can be programmed by your Key Tool Plus, Key Tool Max or even Mini Key Tool. The process is similar to another Xhorse universal key:1)Pick the FCC ID, remote, or your make and model2)Write the configuration into the watch3)Program it to the vehicle by any key programmers you want Here is a complete demonstration for reference:
Part 1. Generate the remoteGo to
Put your smartwatch into the key coil and press “Generate”.
Here if you experience the error “Write Failed”, put your watch slightly deeper so that it could be detected.
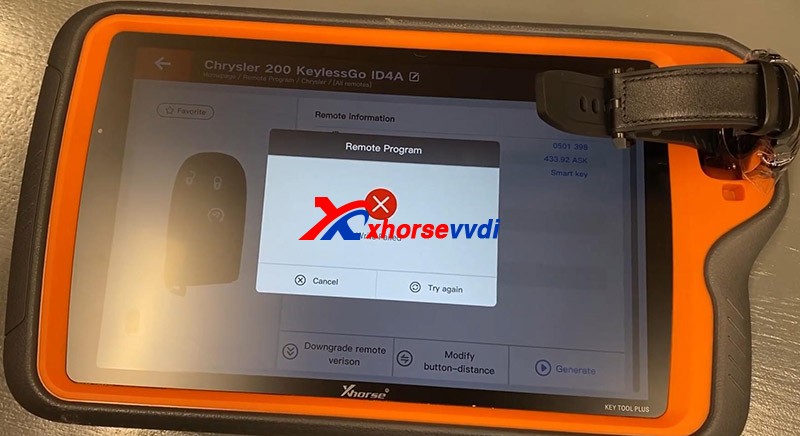
Try again and you should put a slight bit of downward pressure on the watch and it would be done.
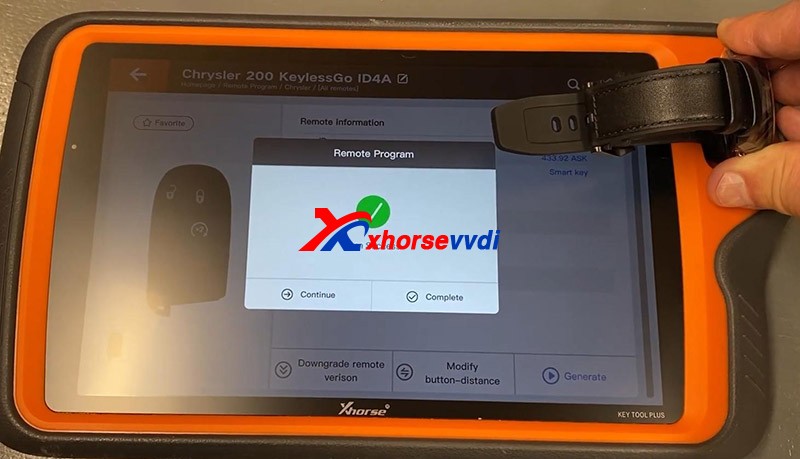
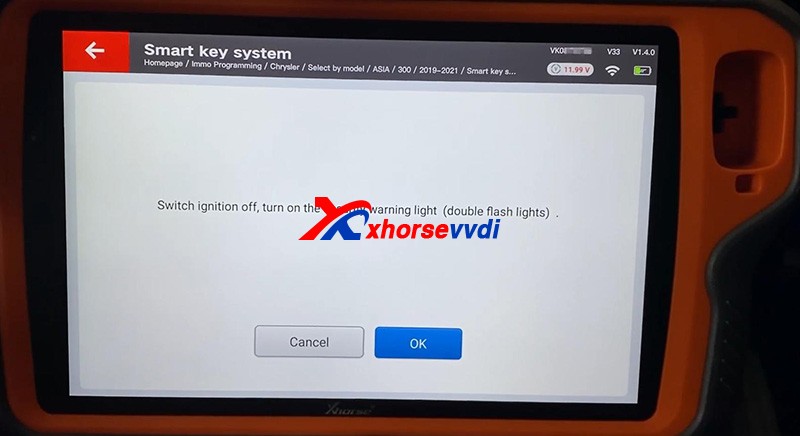
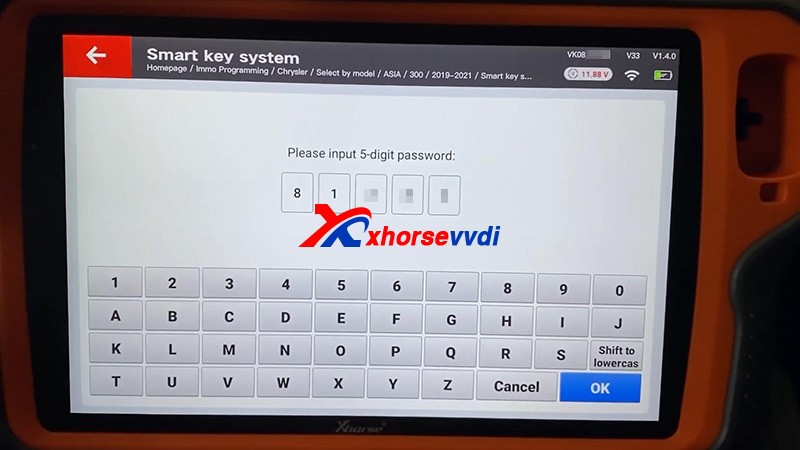
Part 2. Program the immobilizerPlug Key Tool Plus to the vehicle via OBDII, and don’t forget the FCA 12+8 Converter since there is a security gateway in this model.Go to
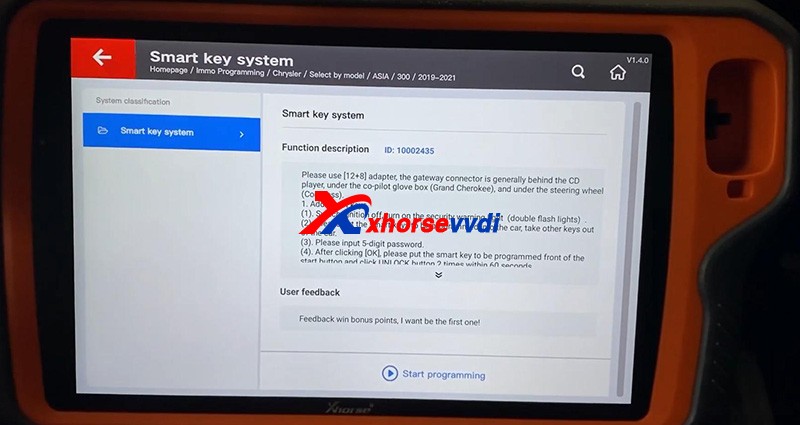

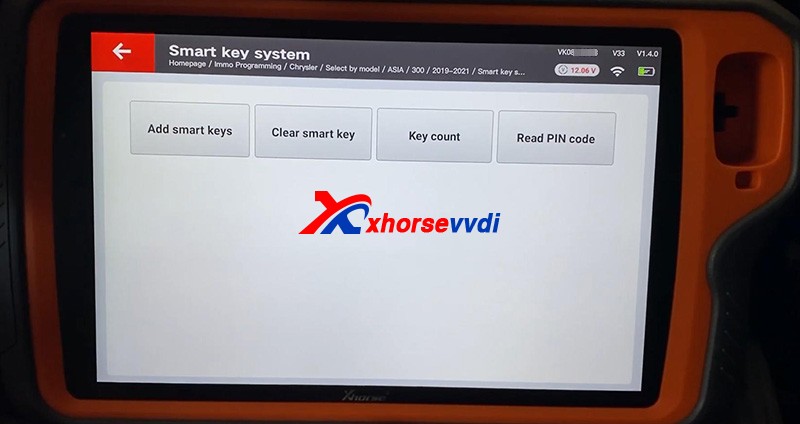
Check “Key Count” and “Read PIN code”.Then press “Add smart keys”
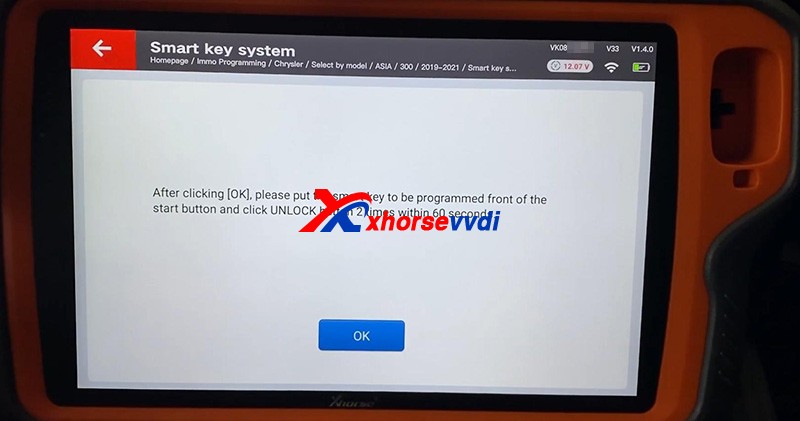
If it prompts “Fail”, try if the watch could work first.Start the vehicle, no problem.

Done!That’s how to use Xhorse SW-007 Smart Watch. Thanks to xhorsevvdi for making this tutorial :http://blog.xhorsevvdi.com/how-to-use-xhorse-keylessgo-watch-smart-remote/
Too many keys, hard to classify, would like a Key with unique design?
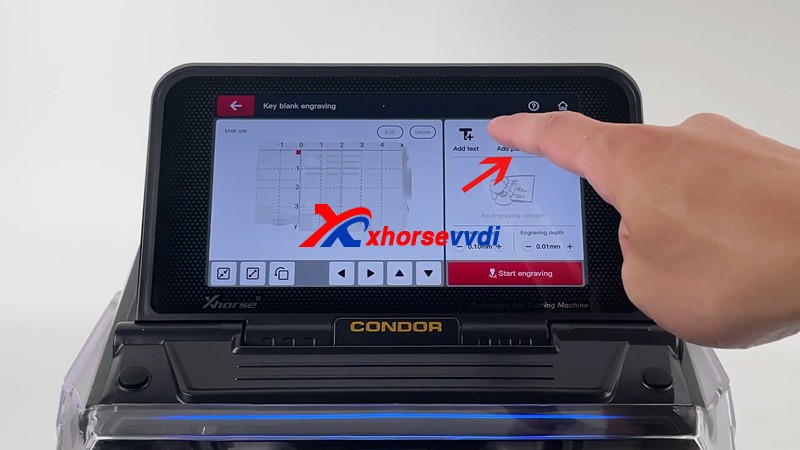
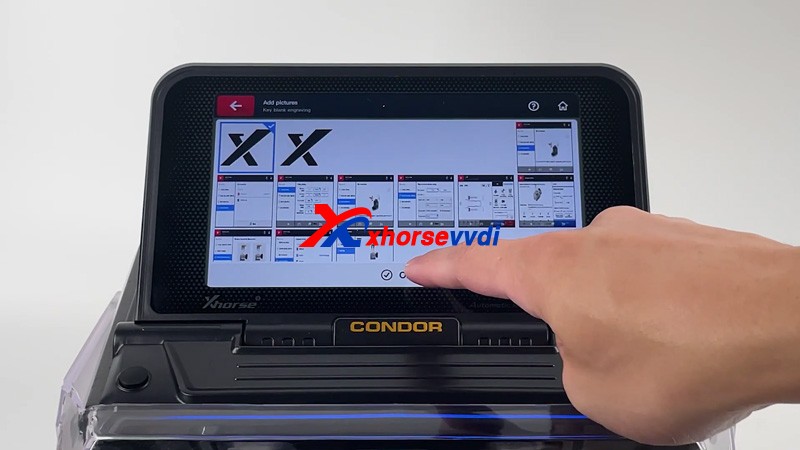
Luckily, Xhorse CONDOR XC-MINI PLUS II featuring thte Key Blank Engraving function,allows users to add and delete texts and pictures, resize and turn them to perfectly design a unique Key.
Today,Xhorsevvdi took an Xhorse’s “ X” image as an example
Tips: The image format must be PNG
Procedure:
Step 1: Insert the engraving cutter and the key blank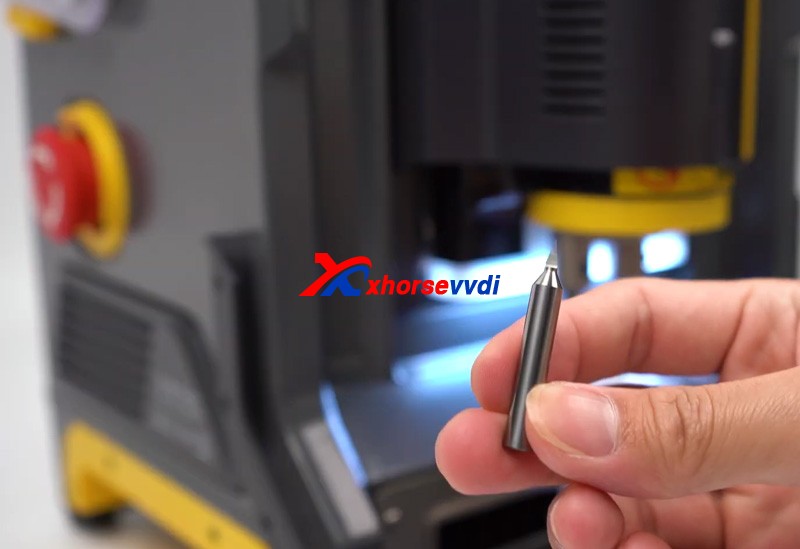
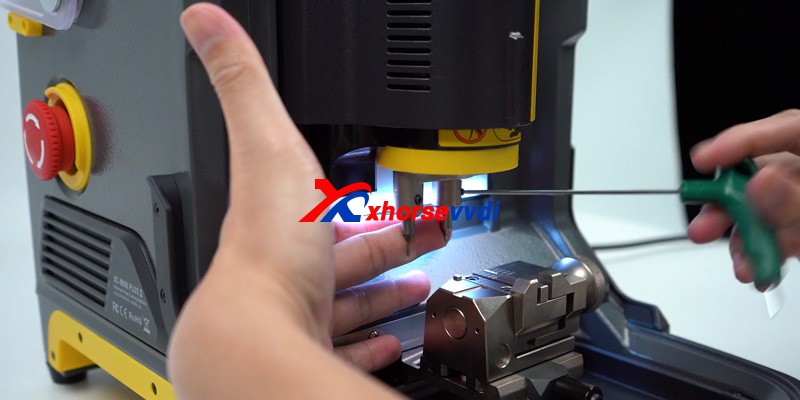
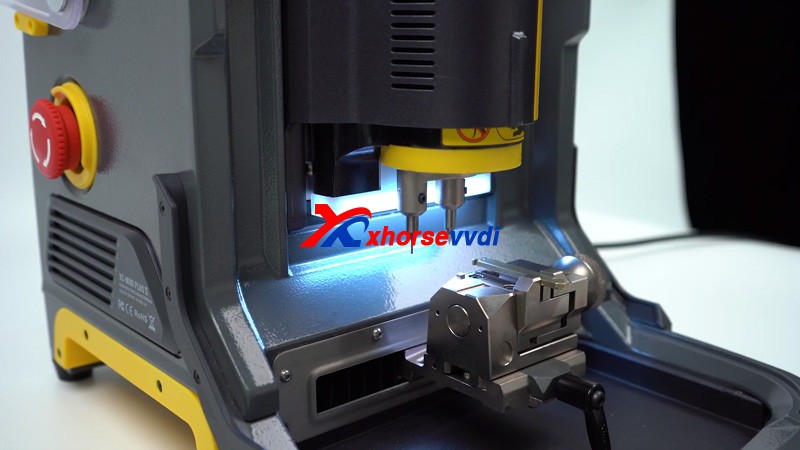
Tips :Engraving cutter and the key blank installation: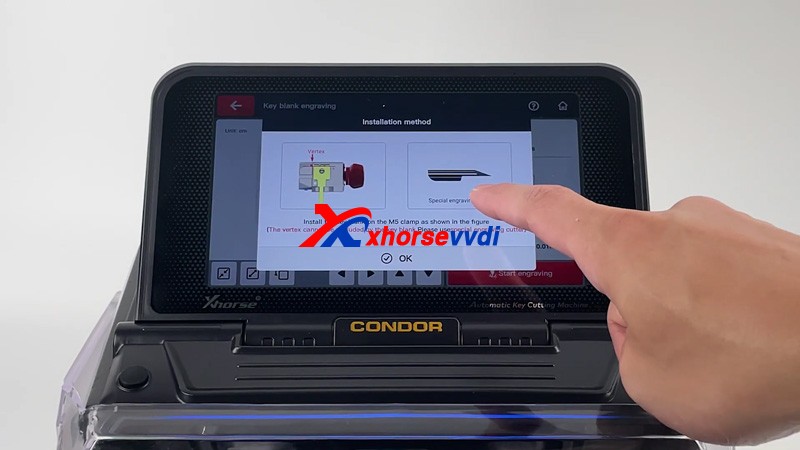
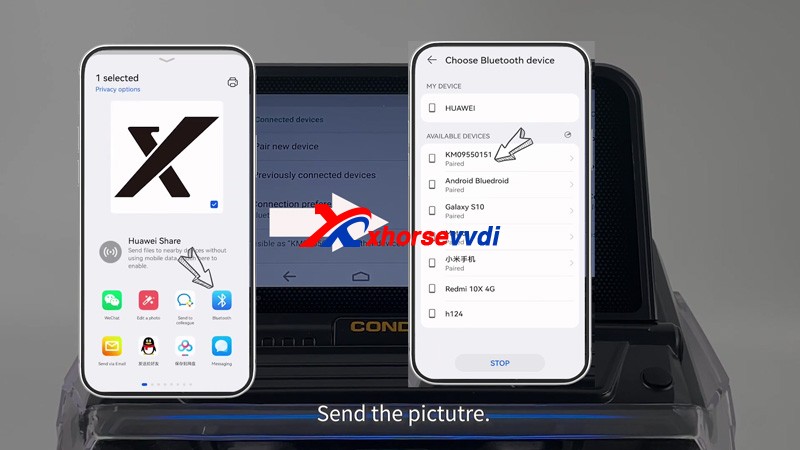
Step 2: Send the picture you want to engrave to the machine
1.Pair the machine with your smartphone via Bluetooth.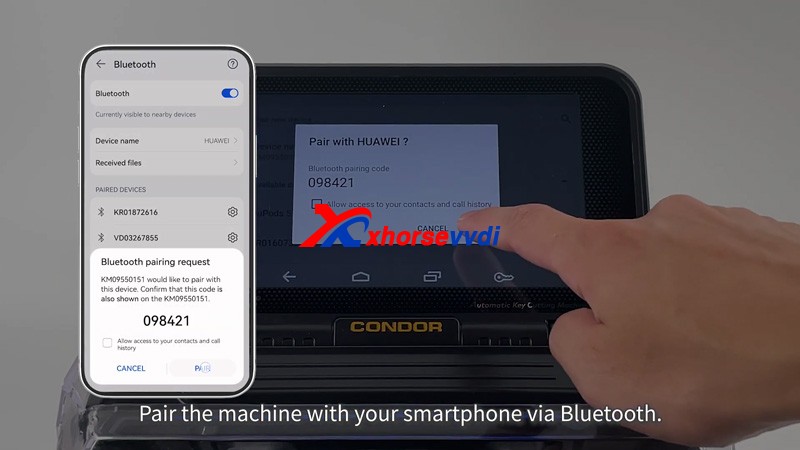
2.Send the picture 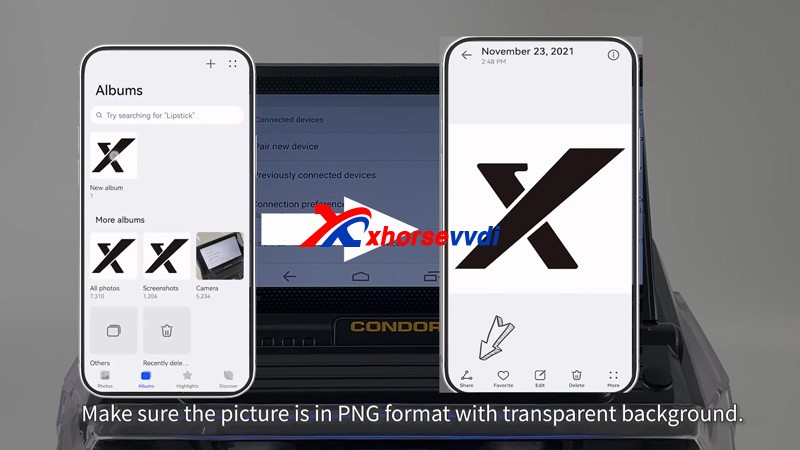
Step 3. Choose the picture and start to engrave
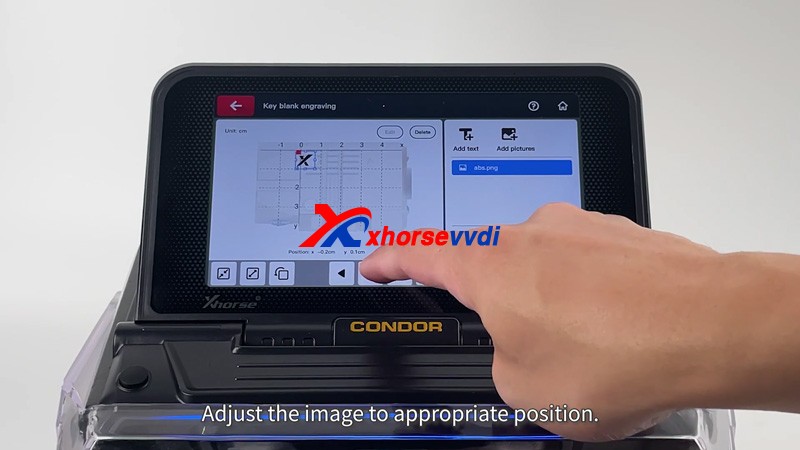
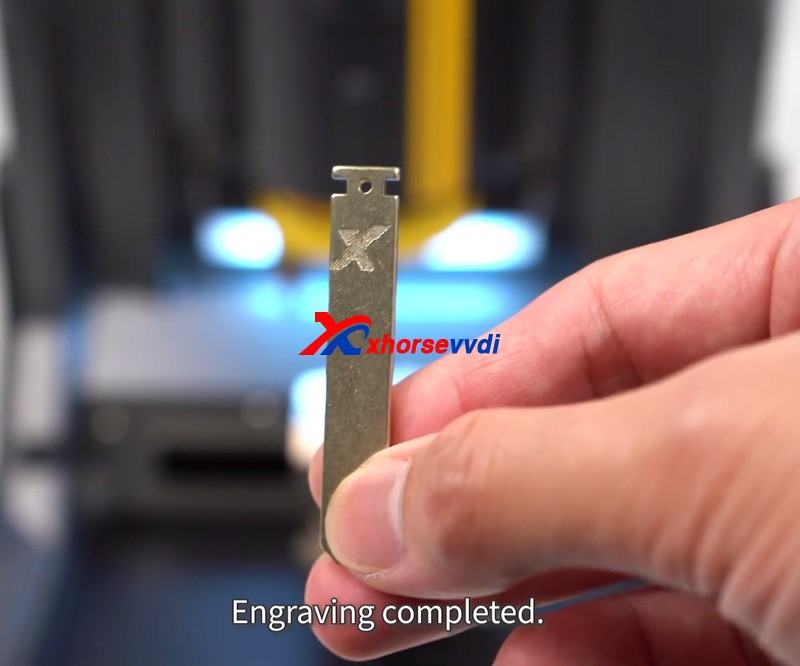
Now Xhorse Condor XC-MINI PlusII Key Cutter starts to carve automatically,The first dot engraved will start from the highest point on the left the image 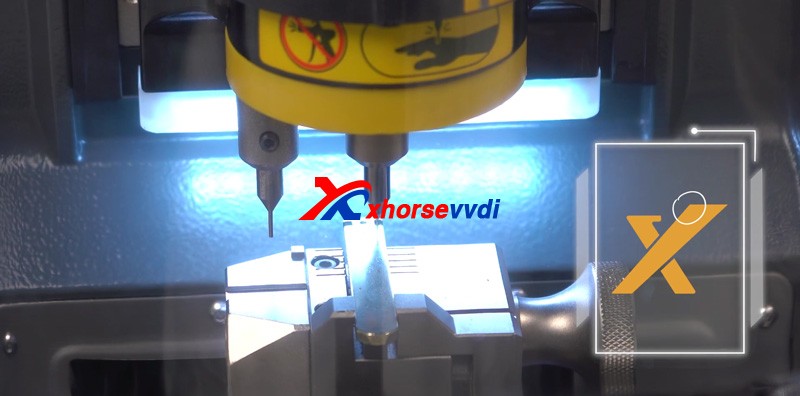
Engraving completed!!!!
Thanks to Xhorsevvdi for making this article:http://blog.xhorsevvdi.com/how-to-customize-keys-with-condor-xc-mini-plusii/
This article is about to show you how to learn and cut Mini Cooper HU100R key using this new Xhorse Dolphin XP005L. First let’s see some highlights of this machine:A complete protection cover and an adjustable touch-screen

Smart LED indicators.

Then start the procedure.
Step 1. Vehicle choose Open it up and select,
Step 2. CalibrationInstall and calibrate clamp M5 side B as instructions.


Step 3. DecodePress “Learn key”.


After Decode key completed, check the result by original key.

Step 4. CutPut new key blade in clamp M5.Press “Cut key” and wait.

Cutting key completed!

Compare with the original one.

Done! Nice and simple.
Great thanks to Xhorsevvdi for making this article:http://blog.xhorsevvdi.com/new-xhorse-dolphin-xp005l-clone-mini-cooper-hu100r-key-tutorial/
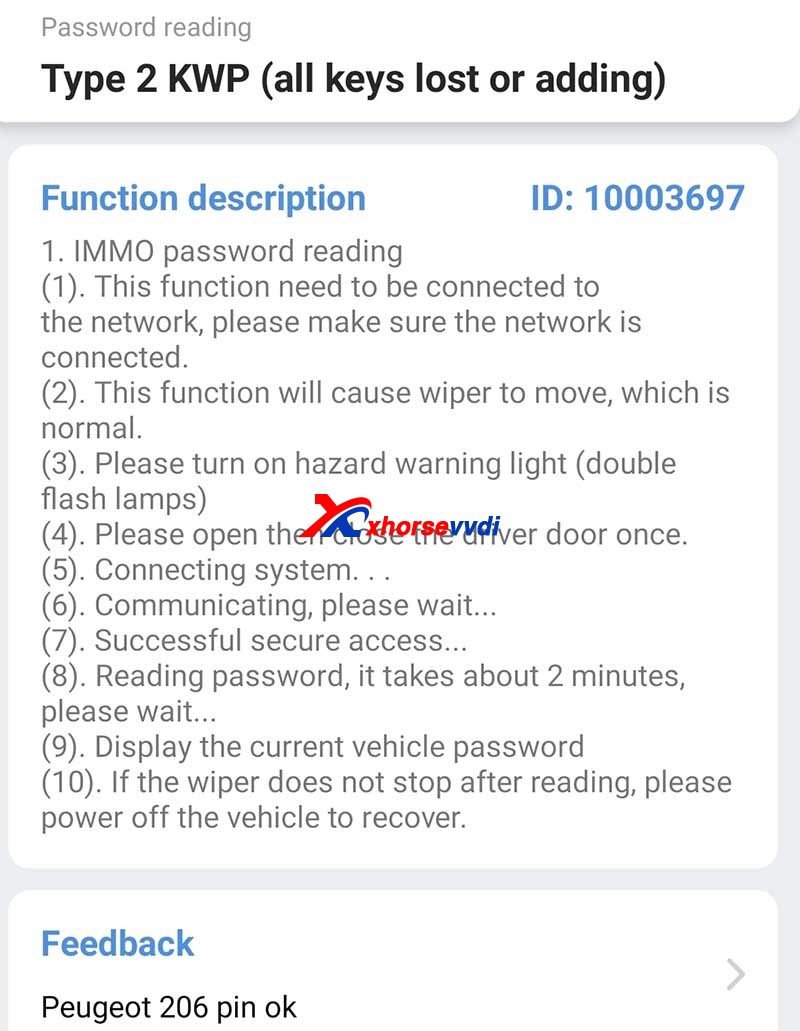
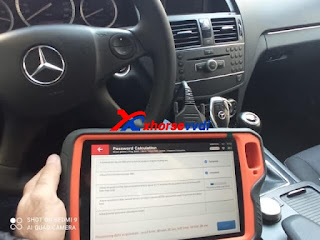
Question: How to do transponder clone for Peugeot 307 all keys lost in Xhorse Key Tool Max?
Generally, the whole procedure is divided in two steps:
1. Read PIN code via OBD or EEPROM
2. Learn/Program keys.
This article provides two ways and some tips for your reference.
Method 1. Read PIN via OBD and program keys
If you have Key Tool Max and Mini OBD Tool, the procedure will be very simple.
General Procedure:
1.Read password by Mini OBD Tool via OBD port.
2.Generate an ID46 Peugeot Citroen chip using VVDI Super Chip and Key Tool Max.
PIN Reading Path :
Method 2. Read PIN via EEPROM and program keys via dump
If you don’t have a password reader, the procedure may be a little bit tough.
General Procedure:
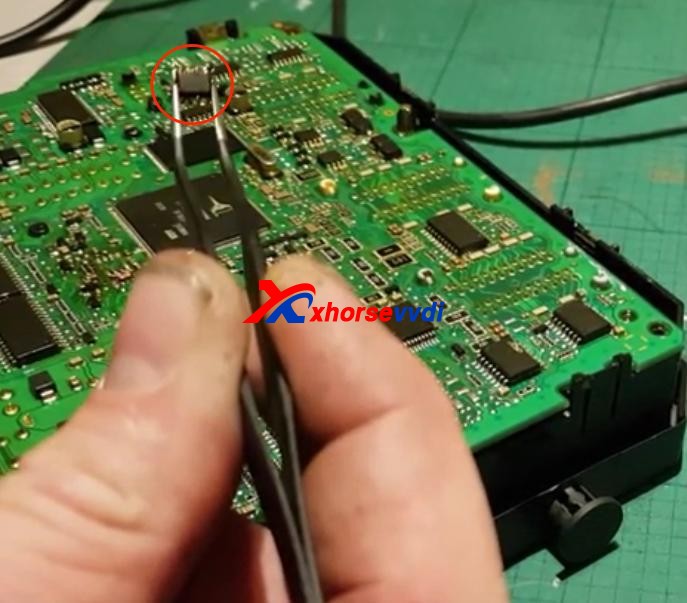
1.Remove BSI module.
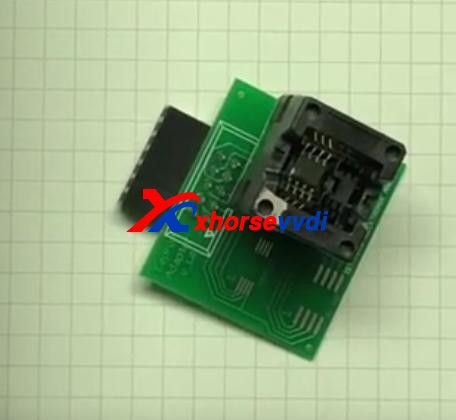
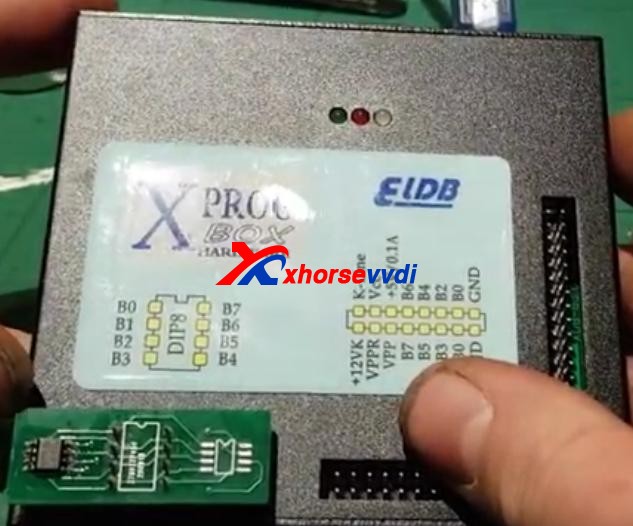
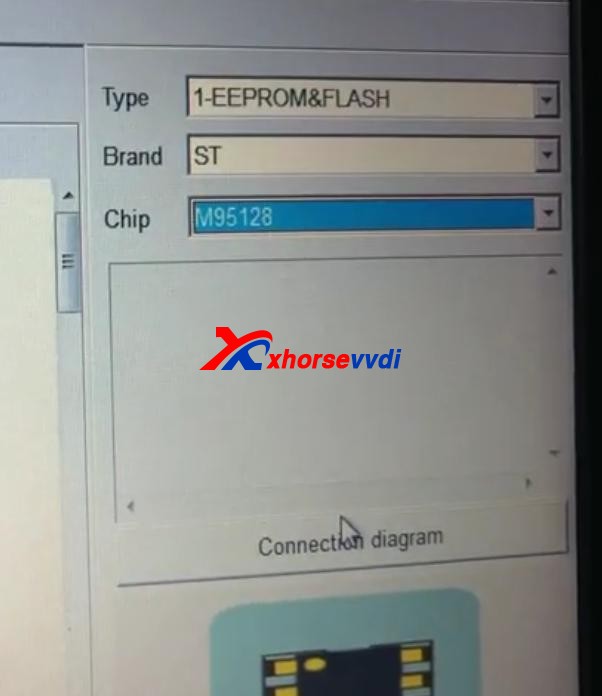
2.Read EEPROM (this step may need desoldering) by an ECU programmer like VVDI PROG or XPROG.
3. Program keys via dump file.
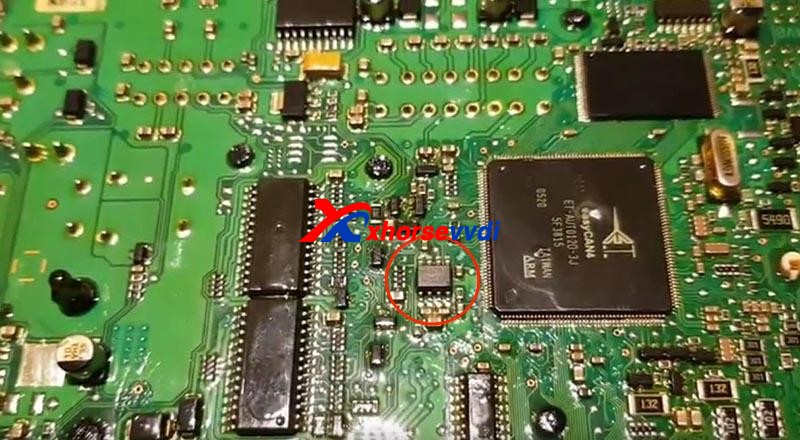
Tips:
1. You may need to take apart the BSI module to get the circuit board.

2. Use hot air very carefully since EEPROM is close to CAN MCU. In any error, the MCU may die.
Thanks to Ghayath, Woj and Gaio.
Any questions feel free to contact us.
http://blog.xhorsevvdi.com/peugeot-307-johnson-bsi-95128-all-keys-lost-programming/
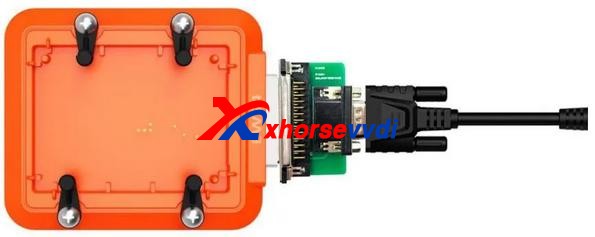
Xhorse solder-free adapters & cables are designed and manufactured for the convenience of its customers. With those, users can enjoy a whole-new working experience without removing chip or cutting wires.Now, Xhorse released nearly 100 adapters and cables which can work with both KEY TOOL PLUS and MINI PROG. They cover a wide range of car modules such as IMMO, ECU instrument etc.
This article is a detailed explanation of Xhorse solder-free adapters and cables for VVDI Key Tool Plus and Mini Prog. This article mainly covers what they can do and how to use them.
Check below:
| Item | Image | For Key Tool Plus | For Mini Prog | Function | Wiring Diagram/Step |
| Basic Adapter | |||||
| XDNP10 Prog EEPROM Adapter(Supplied in package) | √ | √ | Read chip data (Desoldering required) | ||
| Mercedes-Benz Adapters | |||||
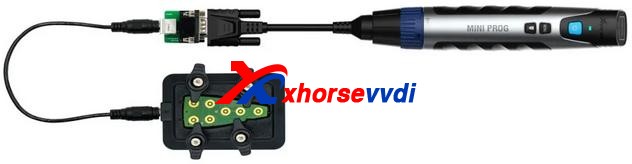
| XDNP13 DB9 Cable | × | √ | Connect Mini Prog to EZS adapter for reading Benz EIS data without soldering | Check with blog | |
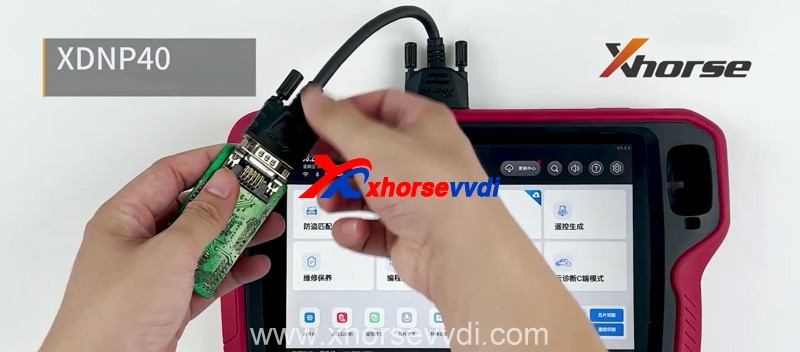
| XDNP40 Benz ELV Adapter | √ | × | Read/Write Benz ELV chip (For repair damaged ELV caused by chip data loss) | ||
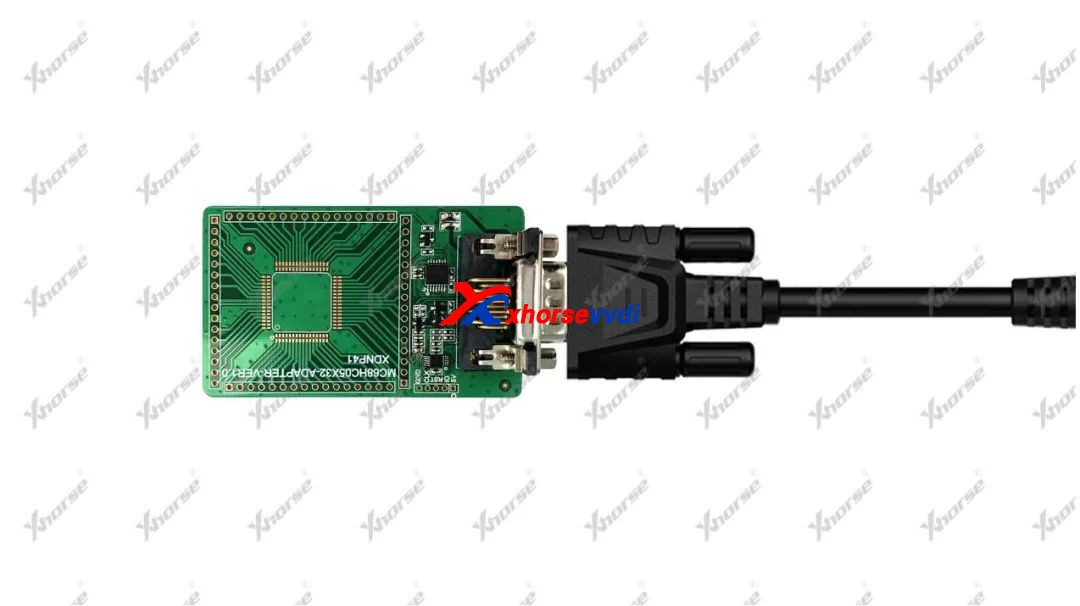
| XDNP41 MC68HC05X32 Adapter | √ | √ | Read/Write old-type Motorola MC68HC05X32 series MCU (Mainly for Benz EIS reading and Benz key programming) | ||
| BMW Adapters | |||||
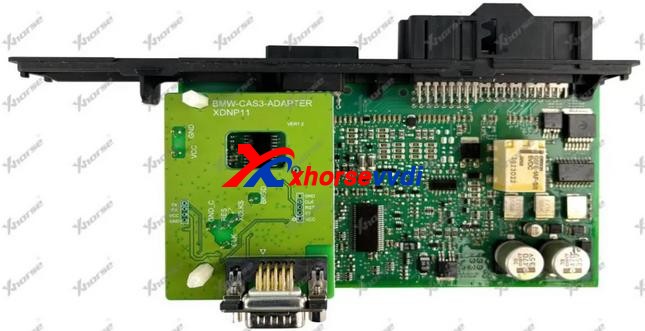
| XDNP11 BMW CAS3/CAS3+ Adapter | √ | √ | Read BMW CAS3/CAS3+ data without soldering | ||
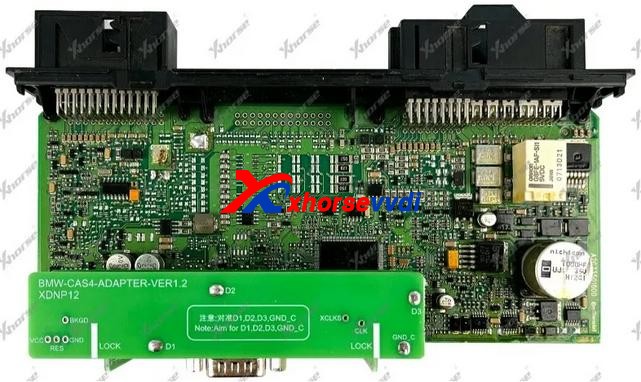
| XDNP12 BMW CAS4/CAS4+ Adapter | √ | √ | Read BMW CAS4/CAS4+ data without soldering | ||
| XDNP14 DB15-DB25 Adapter | √ | √ | Connect Key Tool Plus/Mini Prog to BMW EWS4 adapter (Read ESW4 data without soldering) | ||
| XDNP18 BMW E-Chassis FRM Adapter | √ | √ | Read BMW E-Chassis FRM data without soldering (Repair BMW footwell module) | ||
| XDNP24 D80/35080 Adapter | √ | √ | Erase/Read/Write BMW dashboard 35080 chip (Mainly for BMW E-chassis&F-chassis odometer correction) | ||
| XDNP33 ECU Interface Board Kit (N20 N55 B38) | √ | √ | Work with Bosh ECU adapter to read BMW N20/N55/B38 engine ECU and read ISN for F-chassis (CAS4+/FEM/BDC) AKL | Null | |
| XDNP49 B48/B58 Adapter | √ | √ | Work with Bosh ECU adapter to read BMW B48/B58 engine ECU and read ISN for F-chassis (CAS4+/FEM/BDC) AKL | ||
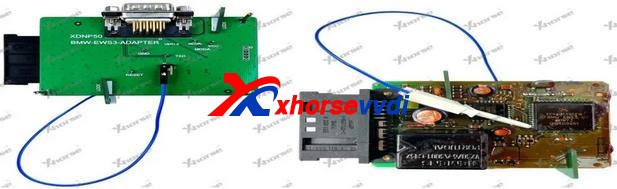
| XDNP50 BMW EWS3 Adapter | √ | √ | Read BMW EWS3 data without soldering | ||
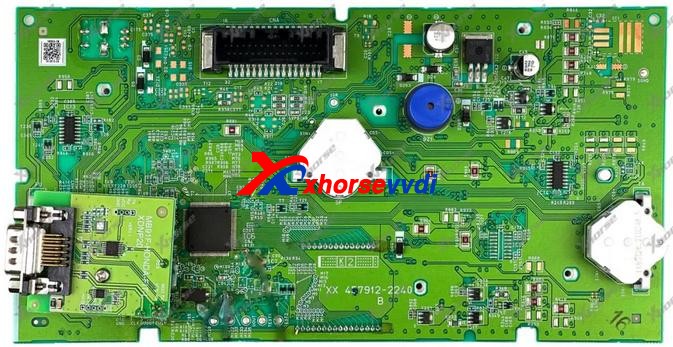
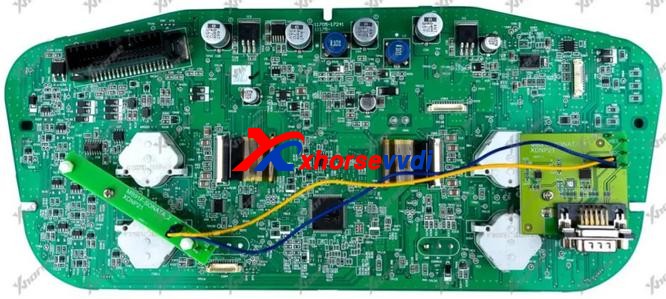
| Instrument Adapters for Honda KIA Hyundai | |||||
| XDNP19 Honda FIT-H Dashboard Adapter | √ | √ | Read/Write Honda FIT-H dashboard without soldering for repairing | ||
| XDNP20 Honda FIT-L Dashboard Adapter | √ | √ | Read/Write Honda FIT-L dashboard without soldering for repairing | ||
| XDNP21 Hyundai Sonata Dashboard Adapter | √ | √ | Read/Write Hyundai Sonata dashboard without soldering for repairing | ||
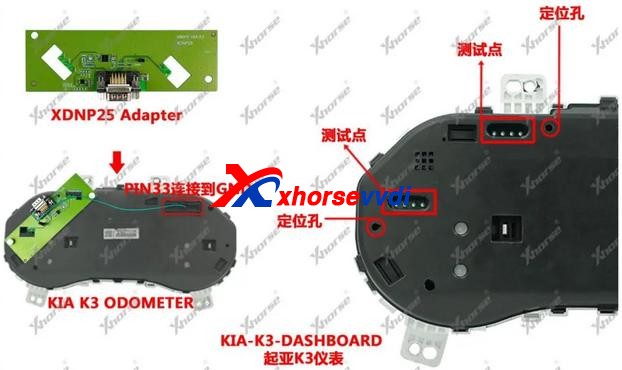
| XDNP25 KIA K3 Dashboard Adapter | √ | √ | Read/Write KIA K3 dashboard without soldering for repairing | ||
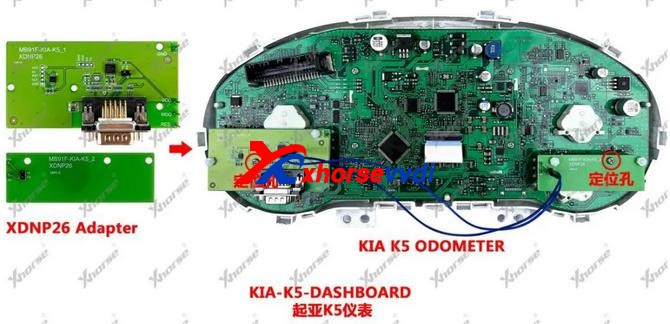
| XDNP26 KIA K5 Dashboard Adapter | √ | √ | Read/Write KIA K5 dashboard without soldering for repairing | ||
| Porsche Adapter | |||||
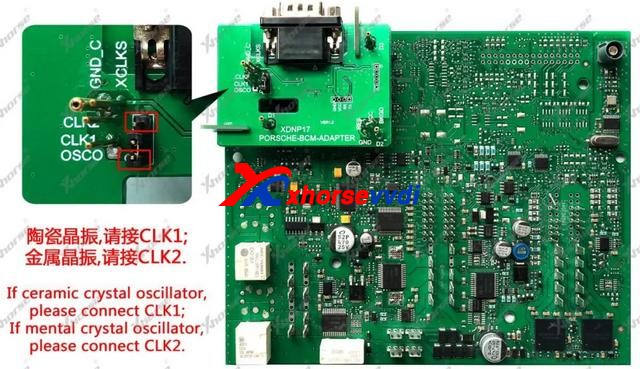
| XDNP17 Porsche BCM Adapter | √ | √ | Read Porsche BCM data without soldering (Support ID49 chip Add Key/AKL) | ||
| Landrover/Jaguar Adapter | |||||
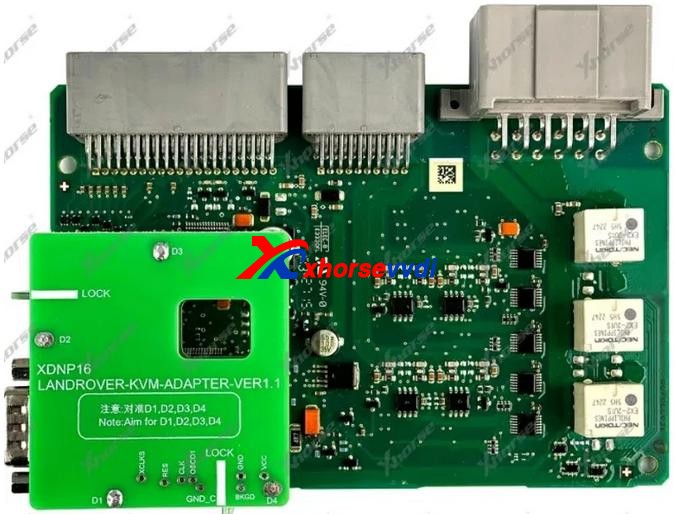
| XDNP16 Landrover KVM Adapter | √ | √ | Read Landrove/Jaguar KVM without soldeing (Support Landrover/Jaguar 2015-2018 Add Key/AKL ) | ||
| Volvo Adapters | |||||
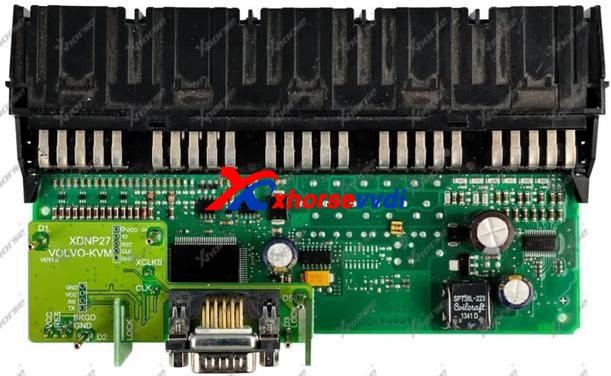
| XDNP27 Volvo KVM Adapter | √ | √ | Read Volvo KVM data without soldering (Smart key programming) | ||
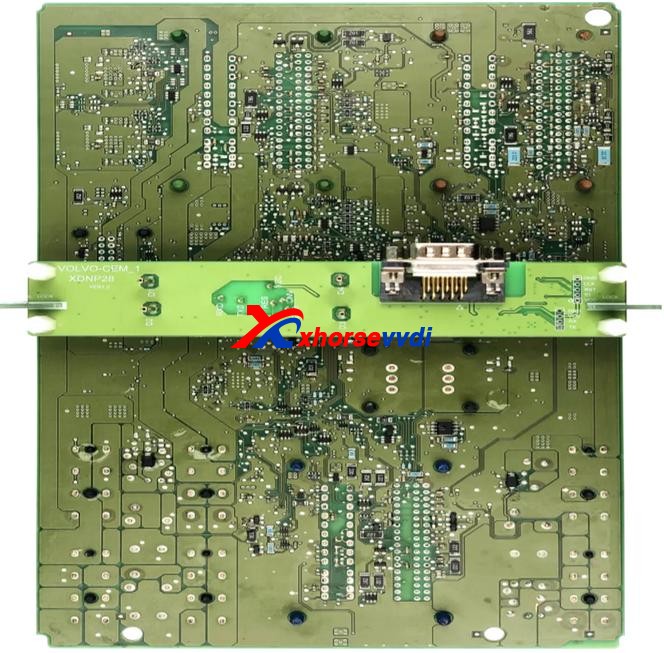
| XDNP28 Volvo CEM-1 Adapter | √ | √ | Read Volvo CEM data without soldering (Semi-smart/Smart key programming) | ||
| XDNP29 Volvo CEM-2 Adapter | √ | √ | Read Volvo CEM data without soldering (Semi-smart/Smart key programming) | ||
| XDNP52 Volvo CEM(MPC5748G) Adapter | √ | √ | Read CEM on Geely Volvo and Geely Lynk & Co without soldering Work with OBD function on Key Tool Plus for Add Key/AKL | Null | |
| XDNP53 Volvo CEM(MPC5646C) Adapter | √ | √ | Read CEM on Geely Volvo and Geely Lynk & Co without soldering Work with OBD function on Key Tool Plus for Add Key/AKL | Null | |
| VW Adapters | |||||
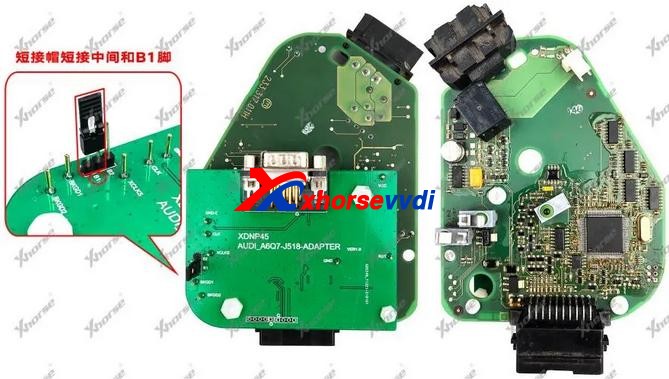
| XDNP45 Audi ESL J518 Adapter | √ | √ | Read/Write Audi ESL J518 for OEM 8E Add Key/AKL on A6, Q7 | ||
| XDNP46 VW MG1CS001 ECU Adapter | √ | √ | Read VW engine data | Null | |
| XDNP47 TMS370 Adapter | √ | √ | Read old-type Jetta IMMO data for ID42 key programming | Null | |
| XDNP55 VW EGS DQ200 Gearbox Adapter | √ | √ | Read/Write VW Audi DQ200 Gearbox ECU without soldering | Null | |
| XDNP56 VW EGS DL382 Gearbox Adapter | √ | √ | Read/Write VW Audi DL382 Gearbox ECU without soldering | Null | |
| XDNP58 VW EGS DL501 Gearbox Adapter | √ | √ | Read/Write VW Audi DL501 Gearbox ECU without soldering | Null | |
| XDNP59 VW EGS DQ250 Gearbox Adapter | √ | √ | Read/Write VW Audi DQ250 Gearbox ECU without soldering | Null | |
| XDNP60 VW EGS VL381 Gearbox Adapter | √ | √ | Read/Write VW Audi VL381 Gearbox ECU without soldering | Null | |
| Honda Adapters | |||||
| XDNP54 Honda Civic BCM Adapter | √ | √ | Read/Write Civic 2019- BCM without soldering for Smart card AKL programming | Null | |
| XDNP57 Honda Vezel BCM Adapter | √ | √ | Read/Write Vezel 2019- BCM without soldering for Smart card AKL programming | Null | |
| Other Adapters | |||||
| XDNP15 DB15-PS2 Adapter | √ | √ | Connect Key Tool Plus/Mini Prog to key renew adapter (Renew or unlock keys) | ||
| XDNP22 12V+5V Power Adapter(Supplied in package) | Null | √ | √ | Supply 5V and 12V power (12V – supply power to BOSH adapter for ECU/EGS reading 5V – TYPE-C port supplies power to Mini Prog) | Null |
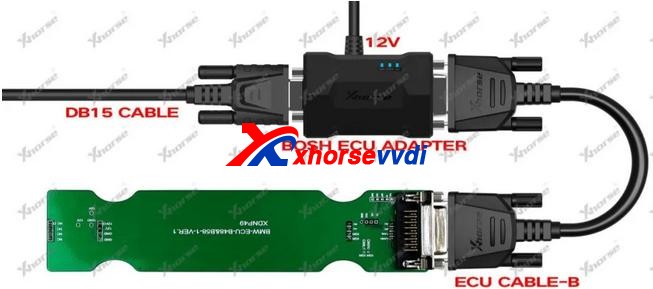
| XDNP30 BOSH ECU Adapter and Cable | √ | √ | Read Engine ECU data by removing engine cover | ||
| XDNP34 MCU Cable(Supplied in package) | √ | √ | Read MCU data to program keys or repair/replace module | ||
| XDNP36 9S12XE Cable(Supplied in KTP default package) | √ | √ | Read/Write Motorala MCU data to repair/replace module | Null | |
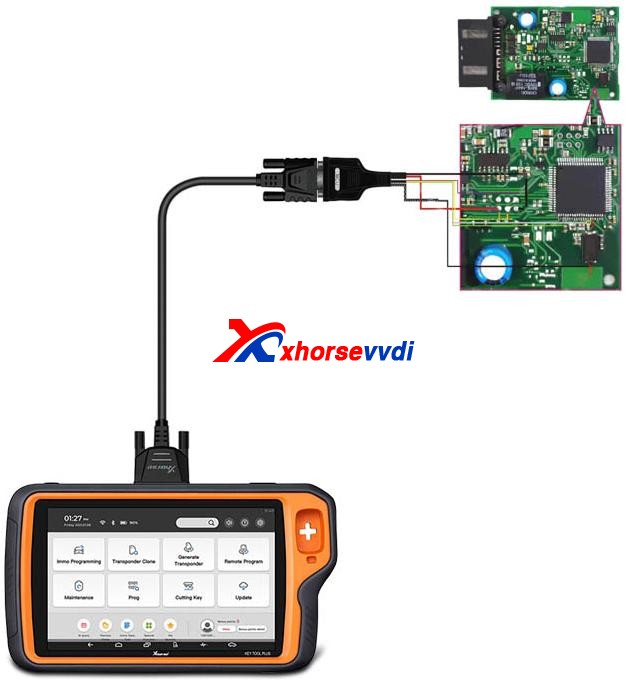
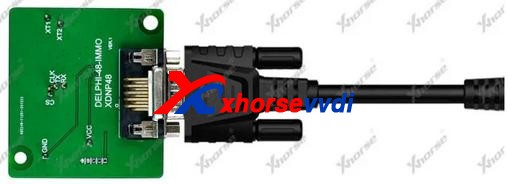
| XDNP48 Delphi-48-IMMO Adapter | √ | √ | Read old-type Greatwall IMMO data for ID48 key programming | ||
| XDKP30 Multi-function Adapter | √ | √ | Compatible for: 1.BOSH ECU Adapter (DB25) No Need Soldering 2.Connect with EZS Adapter (DB9) 3.EWS4 Adapter (DB25) Renew Adapter (Only for MINI Prog) 4.MINI Prog and Key Tool Plus (DB15) | Check with blog |
More adapters are coming!
If you’re interested, we have most of these adapters and cables such as audi bcm2 adapter stock at https://www.xhorsevvdi.com/
This article from https://www.xhorsevvdi.com/service/xhorse-ktp-mini-prog-adapters-full-list.html
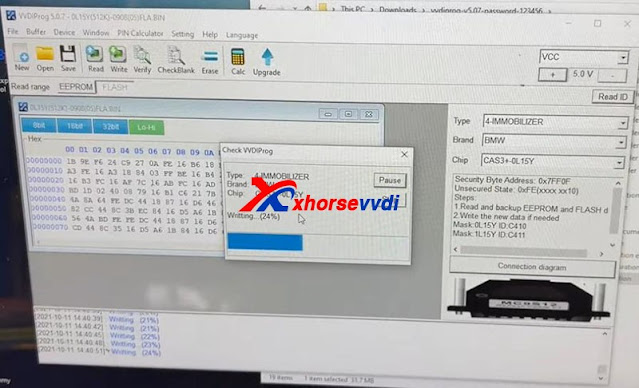
This article is about to compare different ways to read Porsche BCM and program keys by Xhorse Programmer. Some require de-soldering, while some don’t with certain cables and adapters.
Method 1. VVDI PROG (Desoldering required)
This way requires MC9S12 reflash cable included in the package and to desolder components (and to cut wires on part of chips).
1)Panamera (1L15Y) tested OK
It requires removing a component and soldering it back after reading and saving the FLASH file.

2)Macan (1N35H) & Cayenne GTS (5M48H) tested OK
It requires removing two components, cutting a wire, and soldering them back after it’s complete.


General procedure (VVDI PROG+VVDI2):
Method 2. VVDI Programmer with Porsche Fast Easy Cable
This way requires Porsche Fast Easy Cable and wiring. No soldering is required.
This adapter works with VVDI PROG, VVDI2, and Key Tool Plus to read BCM without soldering.
1)1N35H tested OK

The rest procedure is similar to method 1.
Method 3. VVDI Key Tool Plus/Mini Prog with XDNPP017 Adapter
This way requires XDNPP017 Solder-free Adapter, so soldering is not required in this way as well.
1)Cayenne (5M48H) and Macan (1N35H) tested OK


General procedure:


Alright, different methods require different adapters & cables and operation and watch the devices that adapters support.
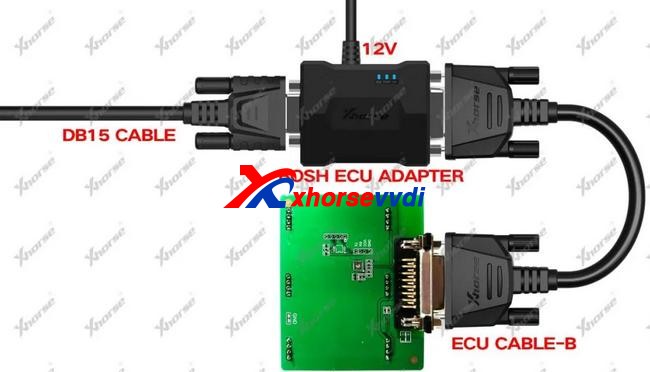
VVDI Prog Adapter for Benz EIS/EZS is used to connected Benz EZS in easy way without soldering, and it is working with key tool plus, but you need have XDKP30 Adapter.
And here is the connection pic of VVDI Key Tool Plus +EZS Adapter+XDKP30 Adapter:
And here is the XDKP30 Adapter
Xhorse Multi-function Adapter is developed especially for connecting old adapters such as BOSH ECU adapter, BENZ EZS adapters, etc. to KEY TOOL PLUS and MINI PROG. This is could help avoid purchasing those new accessories coming with KEY TOOL PLUS again and make full use of your old ones.
And here review of VVDI Key Tool plus program benz car models
1.Mercedes sprinter W906 new key copy

2.Add Key Mercedes W906 2010 year By Obd 20min Job Done


3.All Keys Lost W906 2014


4.Mercedes w204 2007 add-key obd success and surprised


5.Mercedes W212 Key Adding Ok

http://blog.xhorsevvdi.com/xhorse-vvdi-key-tool-plus-work-with-ezs-adapter-ok/
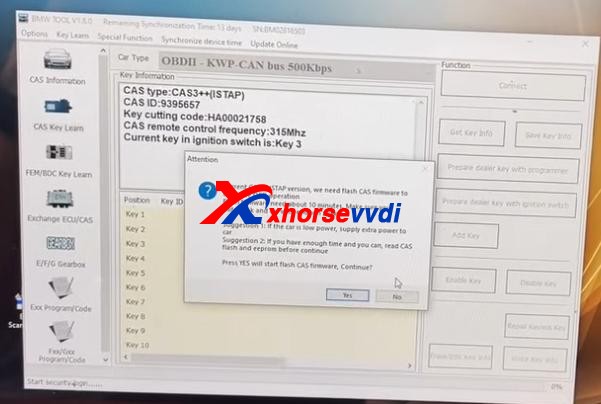
Here we’re trying to downgrade CAS3+ ISTAP. Because it’s encrypted since ISTAP upgrade and it doesn’t allow VVDI BIMTool or any software to write a key to it.
What we want to do is:
Write back the original FLASH data that was doing a key before.
Try to crank CAS3+ module by BIMTool and bench test platform.
Step 1
So, first we write the original FLASH into CAS3 by VVDI Prog Programmer.

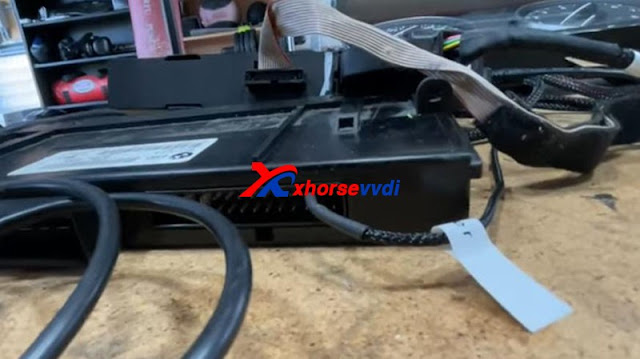
Step 2
Set up bench test platform:
Connect the cable to all hardware (BIMTool, JBE, CAS3, key slot, switch…)
Notice the PIN on JBE module.

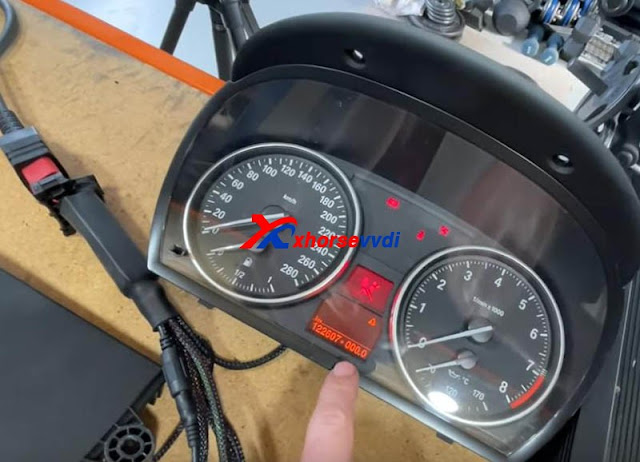
Insert the key and light on the cluster.
We see there is a steering lock but we can bring up the mileage. (The temper dot comes from the mismatch of the kilometer between CAS and cluster)
Step 3
We hook up BIMTool.
Turn to “CAS key learn” page and connect.
Click on “Get Key Info” and “Add key”.
If it’s encrypted, here it’ll prompt.
But, it asks if we’re going to update firmware, which means FLASH writing by VVDI Prog worked.

Now disconnect PC from the Internet.
Press “No” to update firmware.
Then press “Yes” to flash CAS firmware.
Follow the instruction and it gives us key info.
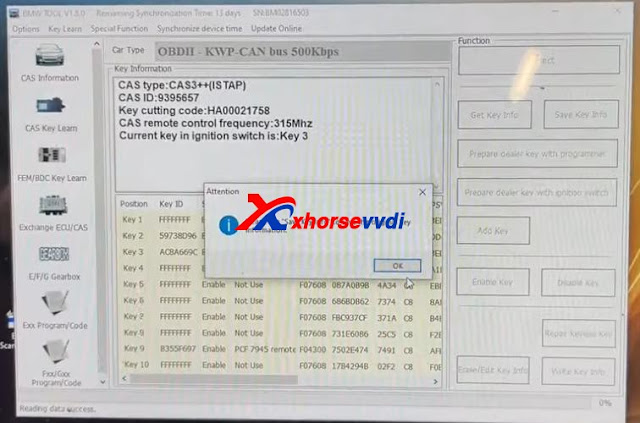
Finally we manage to crack and downgrade CAS3+ ISTAP on bench.
Try if it can give us ISN.
Exchange ECU/CAS>>CAS – CAS3+ OBDII>>Read ECU ISN
No.
Try it via EEPROM dump file that we got from VVDI Prog, and a working key.
Yes.

Done!
More functions to be explored!
http://blog.xhorsevvdi.com/vvdi-prog-bimtool-and-cas3-bench-test-platform-downgrade-istap-success/
This article is about to explain the difference of VVDI Universal Remotes. Different keys have different colors although they are similar in appearance.

Comparison Chart:
1. Wired Key(Red, XK series)
Its circuit board should be connected to VVDI Key Tool Plus/Key Tool Max/Mini Key Tool by Remote generate cable (only one generated in a wired way).
There is no chip, no VVDI Super Chip or battery inside but only a circuit board.
By it we can make a Hyundai flip key since Hyundai doesn’t need a chip, or a Subaru WRX key with a chip, or just generate remote function etc.
2. Wireless Key(Blue, XN series)
This has a built-in chip (not a vvdi super chip), no socket and battery.
Eg. Honda Civic 2009 by Key Tool Plus
Remote Program.
It’ll tell us which one to choose.
Then just generate the remote, and program the chip via OBD port.
3. Super Remote(Purple, XE series)
This has a built-in Super Chip, no battery, so we can clone chips on it when we have a working key.
Eg. Ford F-150 2011 by Key Tool Plus
Remote Program.
We need to generate the remote and the chip on board, because the remote doesn’t learn with the chip.
Path: Generate Transponder>>New 4D+ chip(80 bits)
Then the chip could be learned via OBD port.
4. Smart Remote(Orange, XS series)
Put a battery in and generate it, and learn it via OBD port.

5. Other Tips
If Xhorse Key Programmer says only wireless, it needs to be the blue package with a chip because it means there’s no on-board procedure to learn the remote.
If wired/wireless key, we can use a wired remote and install a chip to it or just program the remote for some vehicles, or use the Super Remote.
Part of materials from russej02.
Source: http://blog.xhorse.co.uk/how-to-choose-xhorse-universal-remotes-with-different-colors/

